Epoxycraft
Menu
  • Home
  • About
  • Epoxy Basics
  • How To
    • DIY
    • Artists
    • Board Sports
    • Woodworking
    • Boat Building
  • Trade Secrets
  • Projects
    • DIY
    • Artists
    • Board Sports
    • Woodworking
    • Boat Building
    • Motorsport
    • Aviation
    • Architecture
  • Meet The Maker
  • News
  • Contribute
  • Contact

How To: The perfect seal: installing hardware safely and securely with WEST SYSTEM epoxy
30th June 2015

The perfect seal: installing hardware safely and securely with WEST SYSTEM epoxy

When installing hardware it’s essential that you plan the process meticulously to avoid any safety issues or on-board damage along the way. This Trade Secret shares two methods to keep your hardware secure and watertight using WEST SYSTEM epoxy.

At one time, installing hardware may have been seen as a process best left to the experts. Many that braved the process themselves would often be left with leaking decks or even damage to the boat core.

The main problems with installing hardware occur when fasteners are not bedded correctly or, in some cases, boat owners leave holes unfilled entirely, allowing water to seep on board.

However, thanks to the exceptional water resistance of WEST SYSTEM epoxy, hardware can now be installed at home with lasting results.

There are two ways to approach the installation. The first is to bond all fasteners (screws, bolts or threaded rod) directly to the surrounding wood fibre. The second is to bond both the fasteners and the hardware itself to the immediate wood fibre on which it rests. Using these hardware bonding installation techniques, you’ll dramatically improve the load-carrying capacity of your hardware so that you can continue to modify your boat with confidence.

Fastener bonding

The fastener-to-wood bond can be done in several ways. The easiest and most common method is to simply wet out a standard-size pilot hole for a given fastener with resin/hardener.

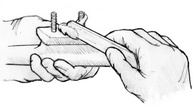
Make easy fastener bonds as follows:

  • Firstly, use a pipe cleaner or syringe to work the mixed epoxy well into the hole.
  • Secondly, insert the fastener in the hole and allow the epoxy to cure. This forms a wood/epoxy matrix around the fastener that is much stronger than the wood by itself and distributes the fastener load over more of the wood fibre area.

Hardware bonding

This technique takes advantage of the fact that WEST SYSTEM® epoxy has a much higher density and strength than the wood fibre itself by bonding the hardware base directly to the surface. Bond for increased load transfer as follows:

  • Drill the fastener holes
    Drill an oversized pilot hole to increase the amount of exposed wood area that the epoxy around the fastener will bond to. This may be twice the diameter of the fastener. Drill the hole 2/3 the depth of the fastener. Next drill a normal sized hole the remaining third, to allow for the bottom threads of the fastener to bite into the wood fibre to remain in position as the epoxy cures.pilot holes
  • Prepare the hardware
    Wash the contact surface of the base with a pure solvent, such as WEST SYSTEM 850 Cleaning Solvent, to remove any contamination.  Allow the solvent to completely evaporate.  Abrade the contact surface with a wire brush or 50-grit sandpaper – this provides a “key” on the surface for the epoxy to adhere.
  • Coat the bottom of the hardware with un-thickened epoxy
    Wire brush or sand the wet epoxy into the surface with 50-grit sandpaper.
  • Fill the holes
    Fill the holes to the top with epoxy. Allow the epoxy to soak into the exposed end grain of the wood for a few minutes. Then inject a non-sagging 406 epoxy mixture into the hole. Use enough mixture so there are no voids in the hole after inserting the fastener.
    sagging mixture
  • Bond the hardware
    Coat the bottom of the hardware and the fastener threads with the thickened mixture and then place the hardware in position. Then, insert and tighten the fasteners until a small amount of the mixture squeezes out of the joint. Make sure you clean any excess epoxy mixture that has squeezed out. Allow the epoxy to cure at least 24 hours before applying load to the hardware.

Whichever method you choose, make use of our support pages on the WSI website to get more expert advice on your installations.


Share on


Back to top-tips-best-ways-to-use-epoxy

Subscribe to our newsletter
Our unique epoxy knowledge and experience, delivered straight to you

Events

Future dates TBC

What is epoxy?

Epoxy Projects

UK Chandleries Open – January 2021

As England, Scotland and Wales enter another lockdown, you may have started work on those home projects. Whether it’s boat maintenance and repairs, a restoration or a brand new build,

Creating an Artisan Gold Ring with Canadian Maple and Epoxy

You may be surprised to learn that the UK is home to some of the finest gold around. Mark discovered this as a child when his father, Edward, would take

Heritage 9.9

Castagnola Launch Heritage 9.9

Castagnola Shipyard has launched the elegant, custom-made Heritage 9.9. Able to reach a cruising speed of 34 knots, the 10.91m custom-built luxury yacht is a fine example of what happens

Nick Zammeti Gets Creative with Epoxy and Liquorice Allsorts

What happens when you give Youtuber Nick Zammeti lots of epoxy and bags of Liquorice Allsorts? You get one incredibly funky table! Nick is well-known and loved in the industry

Meet the Maker – The Resin Reserve

Resin artist, alchemist, resin-gineer. Kate Ede of The Resin Reserve has always kept us in awe of her marvellous and beautiful creations. Inspired by patterns in nature, Kate is a

Split Film Festival Trophies

Creating the 2020 Split Film Festival Trophy

The Split Film Festival is one of the oldest film and video festivals in Croatia, showcasing new films and radical works of all styles, themes and genres. The festival celebrated

Hot Box

How to keep your epoxy warm in winter: build a hotbox

Winter is a challenging time for epoxy products. Warmth is needed to keep the resin fluid enough for dispensing pumps to work well and cold ambient temperature can greatly reduce

How to Work With Epoxy in Cold Weather

The frosty mornings and dark evenings are drawing near. There are projects that need finishing, but what do you do when epoxy and cold weather don’t get on too well.

Mas Snowboard

Snowboard Enthusiasts Taking On The World With Incredible Designs

To many a holidaymaker, Turkey is a haven of golden sand beaches, historic landmarks and party towns. However, it’s not just those looking to top up on their tan that

Class Xero Yacht

Class Xero Combines Coffee and Epoxy in Sustainable Yacht Design

Image credit: Alec Smith - https://www.imagemundi.com Craig Palmer, based in Worthing, is looking at opportunities to bring the marine industry together in a collaborative way. In the middle of building

Craobh Woodwork

Bringing a New Lease of Life to Reclaimed Scottish Timber

Tucked away in the highlands of Scotland is the small village of Culbokie, home to Craobh Woodwork and artisan Bruce Neill. Specialising in producing bespoke timber products from the highest

Final Bar Design

Cheers! Leeds Furniture Maker Creates a Bar Worth Celebrating

James McKay has been a creator since his early years. His fascination for creativity guided his interest into art, design and technology during his school years. James went on to

  • Home
  • Epoxy Basics
  • Projects
    • DIY
    • Artists
    • Board Sports
    • Woodworking
    • Boat Building
    • Motorsport
    • Architecture
    • Aviation
  • Trade Secrets
  • How To
    • DIY
    • Artists
    • Board Sports
    • Boat Building
    • Woodworking
  • News
  • Privacy Policy
  • Contribute
  • Contact
West System
Pro-Set
Entropy Resins
Subscribe to our newsletter
Copyright © 2021 Epoxycraft | Website by MAA