Projects: Building a cedar strip-planked hull
When Anne Barry got the opportunity to build her own boat she took the plunge straight away and – with the help of some experts and WEST SYSTEM® epoxy – she built her very first sandbagger boat.
How did the project come about?
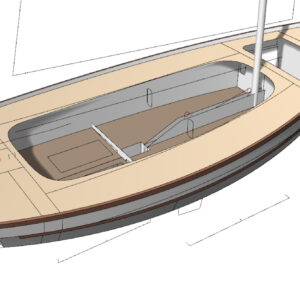
The idea of building a sandbagger happened quite by chance. All I knew was that I wanted a day-sailer; reasonably fast but stable, easily towed behind an ordinary car and with a roomy cockpit. 15 feet seemed more manageable all round. So I decided on the sandbagger, which was the racing version of the work boat known as the New York Bay Sloop.
“I enrolled at St. John’s Central College in the heart of Cork City, which provided the perfect setting for the build”
Having decided on the type of boat I wanted, I enrolled at St. John’s Central College in the heart of Cork City, which provided the perfect setting for the build.
How did you begin? Take us through your building process.
I started by choosing cedar wood for the build, given its lightweight, strong properties. As it happened, the old St. Johns College was about to be demolished – the outside of which was covered in cedar. This was going to be the supply for strip planking my hull, so claw hammers and crowbars went into action to salvage these tongue-and-groove boards before the building was demolished. We then had the challenge of converting these boards into 3/8 inch (12mm) bead and cove strips: ensuring all the fastenings were removed before cutting, scarfing them to double their length and planing to the desired thickness.
With the temporary plywood frames set up on the building jig and the keel, stem and transom in place, the next job was attaching these long skinny strips to form the hull of my baby bagger with glue. Having set up a temporary gluing platform on top of the moulds, it was relatively simple! I used different types of glue depending on how much time was needed to secure the strip in place and how hot it was in the workshop.
Some American manuals on strip planking show staples being used to secure the strips to the frames. Placing a small rectangle of hardboard on the cedar before inserting the staple makes it easier to remove later without leaving marks. This method wasn’t successful where there was a lot of pressure on the strip like in the curve of the bow; to overcome this, a bungee cord was secured at regular intervals to the base of the frames (the way braces might be attached to the back of a pair of trousers) and a temporary baton was attached along the gunwales. Once the glued strip was put in place, the bungee cord was stretched up and over the cedar strip and pulled down, putting pressure on the strip (in the way braces press on your shoulders). Pressure was kept on the shock cord as it was pulled down and under the temporary baton then back up and over the strip and finally down to the temporary baton, before a knot in the cord held it in place. One strip could be secured firmly in a matter of minutes and the whole contraption could be reused for the next strip when the glue dried.
Did you receive any other professional help?
Once the hull was closed in, the next question was how to protect it. Would the hull stand up to the rigours of a sailing rig without reinforcing with glass cloth? What weight cloth should be used? Should I sheath inside and out? Even though I had all the product research, I really needed professional advice – so I went to Spirit Yachts, who gave me advice and directed me to David Johnson at Wessex Resins. He was extremely helpful. I even went to Romsey to do an epoxy workshop with David and the team. I certainly got my money’s worth there with all the questions I asked.
“I even went to Romsey to do an epoxy workshop with David and the team.”
I then set aside time to cut the biaxial, woven and peel ply into lengths. I had decided to apply it horizontally because I had enlisted help and the sheathing operation went well!
Were you pleased with the finished boat?
I was delighted with the outcome and very relieved the whole operation was over. “Gertie” was launched this year in Crosshaven and she won her class at the Glandore Classic Boat Regatta. Her design included the option of two mast positions. Initially I stepped the mast forward in the cat rig position; however, more recently I’ve added a bowsprit and the mast has been moved aft.
Our thanks to Anne Barry for her contribution. If you would like to see your own boatbuilding project featured in epoxycraft for free, then get in touch with us.


