How To: Make Biobased Coasters from Home Art?
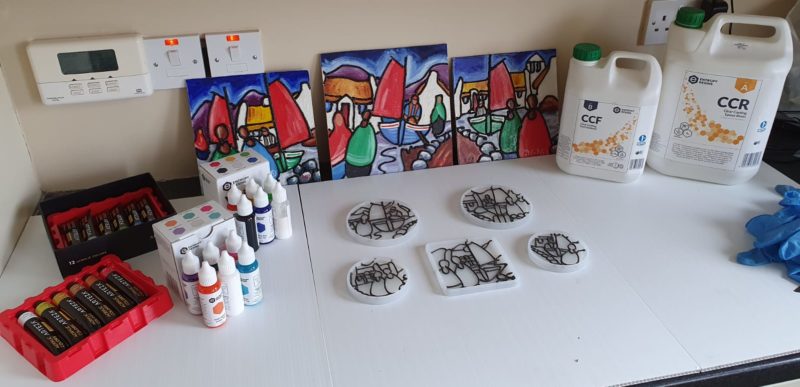
During the UK January lockdown, we set our team a challenge. We sent them a bag of Entropy Resins® goodies and asked them to get creative. In this article, we highlight the work of Gary Thompson. Gary has been a hobby artist for many years so we knew to expect something incredible from him… and he didn’t disappoint. Biobased Coasters, whilst also incorporating his art!
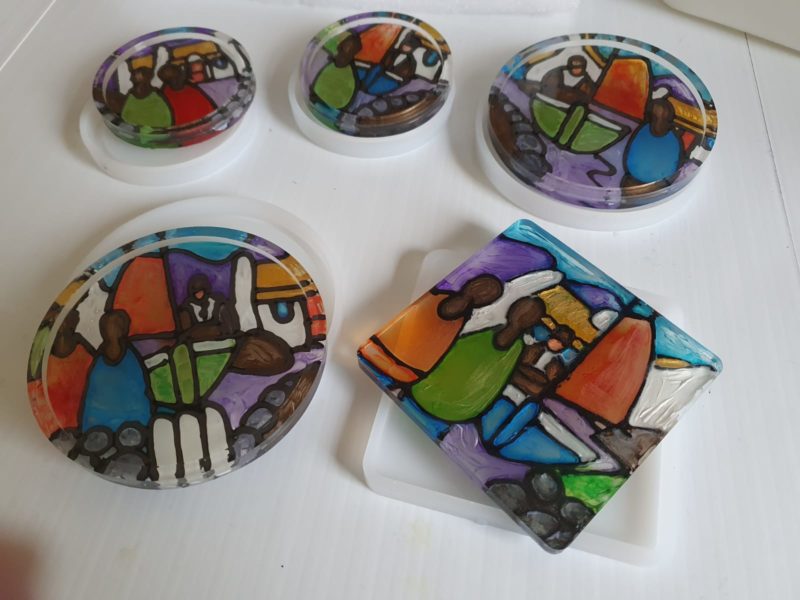
We spoke to Gary to find out how he made these incredible coasters and his inspiration behind the project.
“Inspiration from my coasters came from clearing through the attic during lockdown. I pulled out some boxes containing some ‘primitive’ Irish art scenes that I made 15 years ago.
I always liked the graphic simplicity of design of this school of painting, developed by the famous Markey Robinson. His colours were always a lot more muted and muddy compared to other primitive schools of painting found in more southern climates. This was to reflect the harshness of life in the rural rugged west of Ireland.
I decided to fuse his primitive Irish look with brighter colours of Mexican primitive art. I used a very thick ‘impasto’ style of painting. This entailed using simple black lines lifted off the canvas 3 dimensionally by a ‘piping method’. The overall look gave a stained-glass effect, without the transparency. A ‘light bulb’ moment came 15 years later with Entropy Resins Clear Casting Epoxy. This epoxy would allow me to try and achieve a true transparent effect.
My aim with this project was to create larger framed artworks in mixed media of casting epoxy, tints and paints. I began by purchasing some small flat moulds which are used for creating coasters. I purchased smaller moulds at first. These would give me the opportunity to try out my ideas and techniques on a small scale before scaling up. Plus, if things worked out, I might have a set of original hand-made art coasters as a bonus.”
Step by Step Guide of Gary’s Stained-Glass Coasters:
– Take some of the old paintings and adapt the designs to fit the coaster moulds.
– Pour a thin film of cured mixed epoxy resin on the bottom of the mould.
– Create the thick black lines of the design by piping thickened black paint with the icing bag method.
Gary’s Thoughts: It was a long time since I had done the piping method in fine detail so a steady hand a few years later required a bit of breath holding.
I had done some experimenting a few years earlier, pigmenting thickened WEST SYSTEM® Epoxy with artists acrylic paints I knew that these worked fairly well dissolving very slowly by adding a little bit at a time and mixing and then adding some more. WEST SYSTEM Epoxy lacked the clarity in colour from its slightly amber hardener and so artwork was difficult and this was just for some repair work.
Liquitex produce a range of super heavy body acrylic paints which can be used for the piping. I decided to mix my own special version by thickening the standard black artists’ acrylic with WEST SYSTEM 407 Low Density Filler and a few other elements to help it flow and stick effectively.
– When all is piped in place, leave it to sit overnight to dry.
– Colouring each separate area of the design.
Gary’s Thoughts: Working on a small scale with multiple different colours provided me with the opportunity to try out most colours in the Entropy Resins range and experiment with the intensity. I used the Entropy Resins CCR and CCF fast hardener, and the Entropy Resins colour tints.
The little dropper bottles of the Entropy Resins tints allow you to delicately colour the mixed casting epoxy accurately. The colours dissolve and mix beautifully. I had some areas breach out through my black lines. In these early stages, it was a matter of waiting for the epoxy to gel and cleaning up any overflows with a cotton bud before it would finally stop. Then I continued with the same cotton bud technique with the neighbouring areas, eventually causing each area to dam up and stay contained.
I enjoy adding metallic effects to casting epoxy. I purchased a set of heavy metallic acrylic paints which I used to hand paint highlighted areas of metallic colour over the top of the cured base colour tinted areas within the black lines. This really helped add another dimension to the designs.
– Leave the epoxy to sit for a couple of days to fully cure.
– Once fully cured, pour a finishing layer of clear casting epoxy over the top of the designs.
Gary Thoughts: Bubble-free pouring was achieved by heating the Entropy Resins CCR resin a little before mixing in the CCF hardener so that a low viscosity was achieved. This allows any bubbles from mixing to easily rise and escape. Letting the mixed casting epoxy sit for a few minutes in the pot also allows as many of those bubbles to rise out before pouring on the surface. This final surface was of course actually going to be the bottom of the coaster, but I still worked towards achieving clarity.
At about a 3-hour gel time, I had a couple of tiny bubbles on the surface that I could pick up out of the epoxy with the tip of a plastic/wire bag tag.
While working through the various stages of art on silicone moulds, I kept mindful that the coaster surface was on mould face and would be the reverse of what I was creating. I kept an eye throughout the process by looking through the bottom of the silicone mould.
Leave to fully cure, then perform a post-cure in the oven for 4 hours at 50°C
When I popped them out of the moulds I was chuffed to bits and my experimenting provided me with that nice set of hand-made art coasters. I am now moving onto to scaling up my experimentation and work on larger moulds.
Final thoughts from Gary:
One of the things I really liked about using the Entropy Resins CCR/CCF is that the CCF hardener provides just the perfect amount of time to create each stage of my work while working at around 20°C in the studio.
The epoxy being solvent-free means that no nasty smells were created when I was working. This in turn means that the epoxy doesn’t shrink while it cures and so no stress lines appear on my work and everything stays true to what I have created at each stage.
I was really impressed with the absolute clarity of Entropy Resins CCR and how it really helped my hand colouring and painting to ‘sing’ and ‘shout out’ in ways that I had not seen in general painting on canvas.
It is also nice to know that I when working with Entropy Resins, I am creating things with a product that is ethically and verifiably produced from sustainable resources, helping to create a cleaner, greener world.
Have you subscribed to our FREE monthly newsletter? Sign up here!
Working on a project? Share it with us! Click here…

