Epoxy Basics: Back to basics: dispensing, mixing and adding an epoxy filler
No matter how long you’ve been using epoxy, it’s always worth revisiting the basics to make sure you’re getting them just right. This Trade Secret will provide you with tips and tricks behind dispensing, mixing and adding epoxy filler to minimise waste and get the best results.
At epoxycraft, we’ve given readers the chance to learn a whole range of new techniques and methods for repairing and protecting their boats. However, to get the best results, accuracy in the early stages is crucial. This is why we feel it’s time to look back at perfecting the basic techniques that will help make these processes a success.
This quick reference guide offers essential tips for each process and may help to answer some of your unresolved queries when it comes to epoxy.
Dispensing
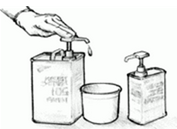
Most problems related to the curing of epoxy can be traced back to the wrong ratio of resin and hardener, so it’s really important to pay attention at the dispensing stage to ensure that perfect cure.
To make measuring clean and simple, we recommend using WEST SYSTEM Mini Pumps which are specially designed to dispense exactly the correct amount of resin and hardener with one stroke of each pump. Simply use one full pump stroke of hardener for one full pump stroke of resin. Be sure to depress each pump head fully and allow the head to return completely before beginning the next stroke as this will ensure an accurate measure.
Dispense into a clean plastic, metal or wax-free paper container. It is important to not use glass or foam containers as these might cause heat build-up.
Mixing resin and hardener
It’s really important that the resin and hardener are mixed thoroughly to produce a completely blended mixture. We recommend mixing for two minutes, making sure you scrape the sides and bottom of the pot to avoid leaving any residue or unmixed resin and hardener at the bottom. A good tip is to use a scraper with a flat bottom which will allow you to get right into the corners and collect up any stray resin/hardener mix.
If you are using WEST SYSTEM epoxy for the first time, we recommend that you start with a small test batch before applying a mix to the job in hand to give you a feel for the mixing and curing process.
Safety first: curing epoxy generates heat
If you think your pot of mixed epoxy is starting to heat up, quickly move it outdoors and avoid breathing in the fumes. Wait until the material has cooled and the reaction is complete before disposing. If you leave the mixed epoxy to stand for the full pot life in a plastic mixing cup, it will generate enough heat to melt the plastic.
Adding fillers and additives to WEST SYSTEM resin/hardener mixes
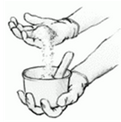
Once you have correctly dispensed and mixed your epoxy resin and hardener, add your epoxy filler or additives to adapt the mixture for many more applications. Fillers are used to thicken epoxy for specific applications such as bonding or fairing whilst additives, including pigments, are used to give additional physical properties or impart colour when used as a coating.
Follow these two steps to add filler to a resin/hardener mix.
- Mix
Mix the desired quantity of resin and hardener for at least two minutes before adding fillers. Begin with a small batch and allow room for the filler. - Add and blend
Blend in small quantities of the appropriate filler until the desired consistency is reached. Ensure the filler is thoroughly blended before the mix is applied.
Now you’ve got the basics covered, don’t forget the Wessex Resins’ website has lots more useful information that could help you get your epoxy project just right.
