Projects: A midsummer day’s sheathing
We’re always delighted when our customers ask for our expert help, so we gladly answered the call from Percy’s garage in Southampton for assistance with laminating a beautiful Canadian canoe. Here, Percy tells us about the project and shares his new-found knowledge of laminating.
To build my canoe, I followed the brilliant instructions contained in Ted Moores’ book, “Canoecraft”. I started by buying some really lovely yellow cedar strip timber from Robbins Timber in Bristol. This can be supplied with a cove and dowel already machined into it. However, I wanted to do this myself so I located the correct cutting heads and passed the strips through my own bench-mounted router. There is something very satisfying about passing long lengths of timber through a router!
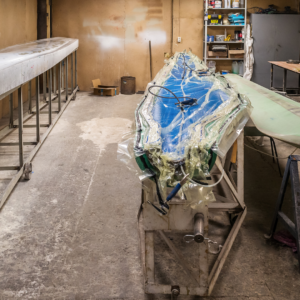
I built the canoe on my own. However, when it came to applying the layer of glass fabric and epoxy to the exterior of the hull, prior to removing it from the build frames, I got in touch with West System International’s technical team for some advice. The WSI team came to my garage and lent a hand with the lamination process to help me out.
We used WEST SYSTEM 105 Epoxy Resin® and 207 Special Clear Hardener™ plus one layer of 200 g/m² twill weave glass fabric. The hardener was chosen for its ability to enhance the natural grain of the timber while adding UV protection.
Perfect conditions for laminating
The WSI team told me the working time and viscosity of the resin and hardener combination was near perfect for the conditions; it was midsummer, with low humidity and around 18°C. When attempting to sheathe a wooden boat that will finally become clear finished wood, they told me it’s very important to ensure conditions are perfect. Any amount of moisture in the fabric, atmosphere or timber can penetrate the epoxy before it has cured and appear as a cloudy surface finish. I had the hull in perfect condition for laminating – it was fair and dust free. We decided to laminate the hull in two halves using a 40mm centreline overlap, so two lengths of cloth were cut and rolled up on separate rolls.
As we were laminating straight onto unsealed wood, it was important that the temperature of the air in the wood fibres was not raised during the process. This would cause the air molecules to expand and form tiny air bubbles under the laminate. Instead, it’s best to laminate on a falling temperature. When epoxy cures there is an exothermic reaction, so when the layers are curing heat will naturally build up. We rolled the cloth down the entire 17ft length and ensured we had good coverage. Where the cloth lay on the vertical surfaces at the bow and stern, we held it in place with epoxy applied along the centreline.
A happy customer
When the WSI team were happy that we were ready to begin, we started to wet out the cloth using brushes and plastic spreaders, paying particular attention to the fabric so as not to disturb the weave. Once the port side was fully wet out we repeated the procedure on the starboard side, ensuring the centreline overlap was neat and true.
With the process underway, I was very happy to have the help and to have broken the back of this slightly technical process. We proceeded to apply a further two coats of WEST SYSTEM epoxy on top of the laminate while it was tacky, to ensure the cloth was thoroughly wetted out with epoxy and the weave was filled.
My wife brought us sandwiches and we enjoyed the sun on our faces while the layers of epoxy started to cure. However, we continually checked the epoxy/glass finish for any air bubbles and any that did appear were carefully brushed out.
Two weeks later, I had sheathed the inside and had started applying numerous coats of two-part varnish to the hull. The reflection of my smiling face in the shiny cedar canoe says it all.
Do you have a project that you’re working on? Email us at pr@westsysteminternational.com and we could feature it in a future edition of epoxycraft!


